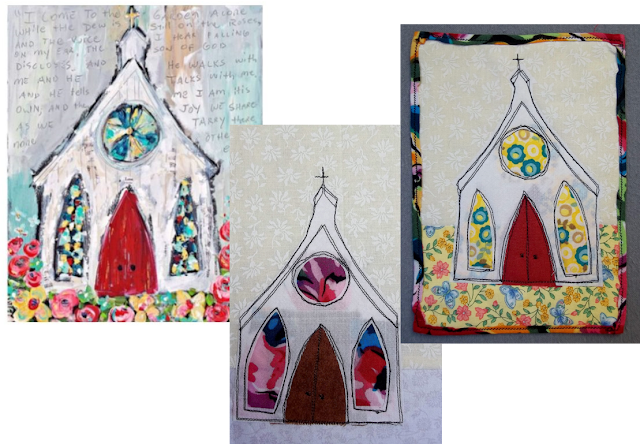
After 18 months of this single mini-quilt postcard hanging out on the edge of my design wall... reminding me that I wanted to do a series of minis... the teasing and taunting got to me, and I chased down that squirrel project.
Last week I shared the completed series and told you that I would create a tutorial explaining the process of how I made them.
I am now here to fulfill my promise! And I want to be a person that keeps her word. 😘
It all begins with a photograph... Print it out to your desired size. I wanted 5" x 7"... Actual postcards are only 4"x6". So... I guess it isn't really a postcard... but whatever. 😉
Trace the outlines that you want to become the quilted/stitching lines. I used a broad marker that bleeds through (be sure you have additional paper underneath so that you don't marker up something unintentionally!)
Place your photo "pattern" on fusible paper with the back side up and fuse to your choice of fabric. (You will see in just a bit why this reversing is important)
Trim your applique shape to the outlines. Cut out any openings you want to have in a different color, such as windows and doors.
Remove the paper backing of the fusing and carefully place your window/door fabric over the openings. Carefully, I lightly tack them in place on a corner or two with a hot iron so that when you move it/turn it, they won't shift.
Prepare your background and fuse into place with a hot iron. You can see in the first pictures that some of them have a two-color background to distinguish the sky/ground. You can determine how much of each accordingly with your picture or imagination. Make the background piece larger than you need so that you can trim to center or shift, if needed.
With the use of black thread add your desired details and "sketch lines".
I like to do two lines of stitching to offer a "rustic" look to the mini-quilt. It also allows for some imperfections to look "normal" and removes the worry of needing it to be perfect. Feel free to add as many details as you desire.
Here are some compilation pictures.
It is subtle, but I learned that you really do need to reverse the picture for the angles to look correct...
The same thing happened with my very first chapel... (the one in the middle) Something is just half a bubble off... like me?
When the quilting is done, choose your backing and finish the edges of the postcard as you desire. I did a "self-binding" on one by folding the backing fabric to the front and stitching it down. I stitched close to the edge of one, leaving it a raw edge finish. One got a regular binding finish and the last one was finished by placing right sides together, stitching around three of the sides, turning right sides out and folding in the 4th side. I then did two lines of sewing to secure all the way around the postcard.
Have you chased any squirrel projects lately?
Leave a comment... I'd love to hear from you
Happy Saturday sewing!
Melva
Linking with:
Off The Wall Friday with Nina Marie
Brag About Your Beauties at From Bolt to Beauty
Peacock Party at Wendy’s Quilts and More
Friday Foto Fun at Powered by Quilting
Finished or Not Friday at Alycia Quilts
Scrap Happy Saturday at Super Scrappy
Patchwork & Quilts at The Quilting Patch
Oh Scrap! at Quilting is More Fun Than Housework
Sunday Stash at QuiltPaintCreate
Monday Making at Love Laugh Quilt
Design Wall Monday at Small Quilts and Doll Quilts
Favorite Finish at MeadowMist Designs


Very pretty - you have inspired me to make another postcard this week and I have the perfect photo. Thanks Melva.
ReplyDeleteI have never made a fabric postcard but I sure like how the chapels/churches look.
ReplyDeleteThanks for showing us how you make your postcards. I always love seeing innovating techniques!
ReplyDeleteWhat a fun diversion. Thanks for taking us through you process.
ReplyDeleteLove your church minis!!! It's interesting to see the different ways you finished them around the edges, too.
ReplyDeleteLove your Adobe church!
ReplyDeleteGreat series! they look so great!
ReplyDeleteThanks for the tutorial. I really like your chapels. I might chase that squirrel project myself someday. Blessings,
ReplyDeleteWhat a great tutorial and idea! Thank you for sharing!
ReplyDeleteHi Melva, Thanks for the tutorial. I like the chapels - all of them. I haven't chased any squirrels lately - I'm trying to be very good and finish all of my UFOs. Hugs, Judy
ReplyDeleteSuch a cute postcard. Thanks for linking up with Thank Goodness It's Finished Friday.
ReplyDeleteI love this serie, pretty blocks!
ReplyDelete