Tuesday, June 29, 2021

Tuesday's To-Do Check-in

Last week seemed to have flown by!  Is it just me???  Or is time speeding up for everyone?

While time zipped right on by, I did manage to meet my goals... mostly


✔  I drew out the block, and tested the block for my customer's memory quilt... I have started cutting fabric.  These blocks are 14-1/2" and will have sashing strips with cornerstones, creating a 9-patch look when joined together.

✔  I cleaned an organized the studio.... sorta. I did get all of the fabric that had been piling up put away in the proper place and I cleaned the closet in the studio.  It was much needed.  The closet where the fabric is stored remains a bit of a mess, but that will have to wait for another time.  I don't have a before and after picture so you will simply have trust that I did do it. 😁


✔  Create a ballerina outfit for the paper dolls.  Tutus were hand-sewn so I spent an afternoon watching Netflix... 


❧  Prep a fish block representing Dave's time fishing on our last camping trip.   I haven't done this YET... but there are plans for a couple more adventures in July so this will happen very soon.

I did work on a big dipper block last week when we made a quick trip to Pueblo for a day of shopping and to watch the oldest grand-daughter play T-ball.  It is about half-done... this is the dipper part of the constellation.

❧  I will continue with the memory quilt...  There are 12 blocks total.  During a normal week, I would say I can get them done and have the top complete.  But since we have two guests coming for a visit Wednesday and Thursday, I will try to get at least 6 blocks pieced.  

Susan is a quilter, and recently acquired a long-arm machine at a bargain price so I am certain we will talk quilting, but we will probably do some local sight-seeing things with her and her daughter.  

❧  A photo shoot with some sweet gals and the Paperdoll Quilts will take place this week!  I showed the quilts to a young 13 year-old 4-H quilter and she loved them as well.  I posted a tutorial over the weekend about how I made them.  You can check them out by following the highlighted link above.

❧  And last, but not least... it is almost time to publish a new block in the Santa Fe Trail Sew Along.  I have included a recipe that you will want to try... maybe at an Independence Day celebration.  Watch for it on Thursday!  

This is a popular week for vacations with the 4th of July holiday over the weekend.  Whether you will be traveling or staying home, be safe!  We will be celebrating with our church family after worship with a cookout and fun games.  And we will probably go to our favorite lookout spot to enjoy the local fireworks.

Are you doing anything special on the 4th?

Leave a comment... I'd love to hear from you!

Gotta run!  

Piece Out,

Melva

Linking with:

To Do Tuesday at Chris Knits & Sews
Mid-week Makers at Quilt Fabrication
Wednesday Wait Loss at The Inquiring Quilter
Stitch Sew & Show at Life in the Scrap Patch

Sunday, June 27, 2021

In Good Company

This morning I was catching up on reading some of the blogs I follow on bloglovin' and came across a post from The Joyful Quilter that shared her news of being included in a list of Top 100 blogs you must follow in 2021.  As I read it and saw that she found it to be an actual list I started thinking...

"Last week I had a spammy looking email offering congratulations to me because I had been included in the Top 100 Quilting Blogs."  Now I didn't take it too seriously for several reasons....

A) My days have been full and I didn't really have any extra time to look into the legitimacy of the list.

1)  There are lots and LOTS of other quilters and designers out there with blogs that see a lot more traffic that mine.

c)  I have been getting notifications that the RSS email subscription through feedburner will be ending in July and I figured this was just something that would replace that.  I have been reading blogs that have been explaining this fact and watching to see what replacements might be available.

Shoot, I have procrastinated in updating my husband's website because I didn't want to "ruin a perfectly good and quiet afternoon with the struggles and difficulties I encounter... every. single. time!"

So, here's your heads up!  If you have been getting notifications via email, one of the best alternatives for staying informed of new posts is by following me on bloglovin'.  I do not pretend to be an expert on this and only now chime in because I am in the midst of the Santa Fe Trail Sew Along and would hate for any of you to miss out on the next block, scheduled to published on July 1. 

So... with that being said... It is only because of all of you that I am included in the list (#78, btw) with all the amazing bloggers in the world!  From the bottom of my heart... Thank you. 💗


I'll be in my studio prepping some clothing from a customer for a memory quilt in her mother's honor... hiding from the world of technology that I manage to blindly fumble my way through with the help of tech support and youtube videos.  

This is the block pattern I will be using.

Quilt Happy!

Melva


Saturday, June 26, 2021

June One Month Goal - Paper Dolls Quilt Tutorial

 My June One Month Goal was to finish the Paper Doll Quilts.  And that goal was successfully met with ease.  I still have a month to play with making additional clothing before they are gifted to our grand-daughters for their birthdays in late July and early August.

There has been great interest in the process of making these quilts so here is a short tutorial for the smaller dolls that are on 12-1/2" squares.  (I used the same patterns for the larger dolls, but enlarged them by about 130%)


The pattern was from Red Boot Quilt Company.  I started with one of the dolls that had the entire body and then added hair and underwear  using a lightweight fusible adhesive.  A
 one-piece swimsuit became my pattern for the underwear.

There are a variety of hair styles available in the pattern, as well.

I skipped making the facial features, though they are really cute.  I just kept remembering some small dolls from my childhood with no faces and how they allowed for imagination.

The next step was to stitch down the edges of the fusible applique and then add the velcro for the placement of the clothing and shoes.  The velcro was an iron-on product that I found at our local Wally-world.  I also ordered some from everyone's favorite big-box supplier, Amazon.

I cut a one inch piece, then cut in half lengthwise and positioned it on the underwear in the "armhole" area as indicated in the picture below.  The velcro on the waist area is a 1-1/2" strip, again, cut in half lengthwise. Be sure to use the soft portion of the velcro on the dolls.  The hard, pokey part of the velcro will be used on the back of the clothing.


The velcro for the shoes was next, the strip is as long as the feet are wide and then cut in half lengthwise.

I was then ready to join all of the blocks together and added borders.  Quilting was next... I simply outline stitched the dolls and did a 1/4" echo line of the block seams.

The pocket of the quilt to store the clothing was a "blank" block.  I fused the velcro in place before quilting, leaving the outside of the pocket off of the top during quilting.  After quilting was completed, I hand-stitched the pocket into place.

Now for the really fun part!  Making the clothes... again, I used various patterns from the Paper Dolls Quilt pattern from Red Boot Quilt Company.


1.  Apply fusible adhesive to the muslin, trace your desired pattern.

2.  Cut out and remove the paper backing the adhesive.

3.  Place onto the back of your clothing fabric and fuse.

4.  Cut out.

5.  Carefully do a zig-zag stitch on the perimeter of the piece.  I used invisible thread.  I then applied fray-check to the raw edges as an additional step to prevent the fraying of the clothing.

6.  Apply the hard, pokey portion of the velcro to the back of clothing.  Allow the adhesive to fully cool before "playing" with the clothes. It will be tempting... 😉

And there you have it!  When I started this whole project at the suggestion of my husband, I thought it was a crazy, fun idea... and somewhat questioned the feasibility of it, but I am beyond thrilled with the final result.


My Mom and I both have enjoyed dressing the dolls.  She made the "farmer" with the overalls... adorable!

The possibilities are endless and I have many more "careers" that I want to make as well as some seasonal outfits... like Halloween, Christmas and Valentines... 

This is a great project for using up small scraps and chunks of fabric and you are only limited by your imagination.  I can't wait to gift them!

Thanks for joining me for this short tutorial... and many thanks to the Red Boot Quilt Company for the inspiration and basic pattern!

I have to finish straightening my studio since I have simply been shoving piles of fabric back into my fabric closet as I have finished with them since April.  

Any tips on organizing your fabric?

Do you sort by color?  By size, such as pre-cuts, fat-quarters and 1/2 yard or more? All I have to say is mine is a hot mess right now...  Leave a comment.  I'd love to hear your suggestions.

Quilt Happy!

Melva

Linking with:

Scrap Happy Saturday at Super Scrappy
UFO Busting at Tish’s Wonderland
One Month Goal at Elm Street Quilts
Oh Scrap! at Quilting is More Fun Than Housework
Sunday Stash at QuiltPaintCreate
Patchwork & Quilts at The Quilting Patch
Monday Making at Love Laugh Quilt
Design Wall Monday at Small Quilts and Doll Quilts


Tuesday, June 22, 2021

Monday's Finish

✔Finally!  The Paper Doll quilts are done.  Both have had the binding sewn down and they are ready to be dressed... and re-dressed!  You may have noticed  that I opted out of putting faces on the dolls.  I don't think that will take away any of the fun and joy the girls will have while playing with them.


All I need now are the clothes.  Most of the clothing for the larger dolls were made by me and embellished and dolled up by my Mom.  She has several outfits for the smaller dolls ready for the iron-on velcro to be attached.  


Once I have the quilts and the clothing together I will do a photo shoot with a couple of little gals that are just a few months older than my little Maggie who will be 5 in July.  

❧With this project wrapped up I will be turning my attention to another custom memory quilt.


I don't have the clothing pieces yet, but my customer has requested a block pattern like this one...  (It looks like a lot of Y-seams but I will will be taking a stab at designing it so those aren't necessary.)


I am not 100% sure that I can use ALL of the clothing, but that remains to be seen.  I'll be honest, those sweaters scare me a little... My customer tells me that they are light-weight, more like jersey knit than a sweater.  If they are as she says they are, I will simply use fusible interfacing to stabilize them without a second thought.

Have YOU used a sweater in a memory quilt?

I'd love to hear from you with any suggestions you might have.  Leave a comment.

What other things will I be doing?  

❧  Well, since I have an open cutting and table and design wall... I will clean an organize the studio.  It is much needed and it is time!  I have been just shoving piles of fabric left over from the various quilts into my stash closet.  

❧  I will prep a few more postcard blocks for Fiona Sandwich's Summer Camp sewing challenge, including a fish block representing Dave's time fishing on our last trip. 

❧  I want to create a little ballerina outfit for the paper dolls, and perhaps play with some other clothing, so I will need the patterns in my hands.

Have a blessed week and quilty week!

Melva

Have you seen any of the Snowflake blocks from the Santa Fe Trail Sew Along? I love the variety and styles. 💗💜💙💛  The pattern is still available and free until July 22. And there is still time to link up a finished block for a chance to win a free fat quarter.  The next block will be published July 1.


Linking with:

Monday Making at Love Laugh Quilt
Design Wall Monday at Small Quilts and Doll Quilts
To Do Tuesday at Chris Knits & Sews
Mid-week Makers at Quilt Fabrication
Wednesday Wait Loss at The Inquiring Quilter
Stitch Sew & Show at Life in the Scrap Patch
Put Your Foot Down at For the Love of Geese

Tuesday, June 15, 2021

Summer Camp

Summer took long enough to get here!  Okay, okay, so it isn't officially "summer" on the calendar yet, and "summer" may have started for others with the end of a school year or Memorial Day Weekend, but for me summer starts when our camping season starts.  And it was late this year for us... 


Last week we (finally) found our way with friends to the Conejos Camp Ground located in the Rio Grande National Forest.  It took us a little over 3 hours to drive to our destination.  It is remote and there is absolutely no connection to the world because there are no cell towers in the area.

We spotted three big horn sheep a few miles from the campground!  I was excited about that because that means that I have a "new" block to include in our camping journal quilt.  While I have plenty of postcard patterns that could be used, I don't want to overuse many of them.  


Dave got to celebrate the anniversary of his appearance to the world while we were in the wilderness by fishing.  He isn't much a sit on a shore of a lake type of fisherman, but he really enjoyed fishing the creeks and the Conejos River.  The river ran along the edge of our camp site and the sound of the water was calming and enjoyable (and convenient, allowing us to be near the camper).  


But we also ventured out to another area.  The first time out was not properly planned.  We ALL walked away from the truck with nothing but the phones for cameras and fishing gear.  Greenhorns!  We should have had water at the very least...  Sorry about the blur in the picture, but the road was rough. 

We have been enjoying adventures with these friends for 26 years, including our exciting journey to the dinosaur tracks at the Picketwire Canyon last November.  Good times, good laughs and good memories!


The trout needed to be 16" or longer to be "keepers" and Dave finally caught one that would would have made a great dinner.  But, sadly, it got away... WITH a favorite lure.  BUT I happened to have the camera to capture the moment! 

I mentioned last week that Rachel at Fiona Sandwich created a "summer camp" and a summer sewing log... And while Dave enjoyed fishing, I successfully checked off five items.   Here they are...


My blocks included... ✔larger star, ✔open spacea pine tree trunk, a barrel cactus, campfire.

I still have a few more kits that are ready to go, but I will need to prep a few more for future trips.


While we were "unplugged" the fourth block in the Santa Fe Trail Sew Along was published without a single issue.  Woohoo!  Did you see it?  The snowflake is a type of a log cabin block, cut once on a diagonal and a "spine" inserted.  It is easier to piece than it looks and it is generous in size with the intention of trimming down to size to guarantee that the completed square is 12-1/2 inches.  Get the pattern (free until July 22) and link up for a chance to win a free FQ.  The linky party will be open until July 1.  


✔ I have my personal paper doll quilt blocks prepped (ok, they are only pin basted and have no binding, but I have to move forward) and as soon as I get the two blocks I passed on to my Mom with the clothing patterns, I will get the tops assembled and quilted.

Even though we got home on Saturday and it is now Tuesday I feel like I am still playing catch-up.  And having that small taste of rest and time away makes me only want MORE!  Wah...  

I think the biggest problem is that I haven't been sleeping well. We have had several days of temps in the 90s and we don't have central air.  We have been sleeping with the windows open because it really does cool off nicely once the sun goes down, but it has also been windy.  A gentle breeze would be fine, but we have had gusty nights.  We have two window units that have been recently  put into place and, fingers crossed, we will be resting peacefully with windows shut and keeping cool.

I made some fresh fruit pops to enjoy during a hot afternoon.  Fresh strawberries, blueberries, some applesauce and a splash of apple juice... they are quite refreshing!

What are some of your favorite ways to keep cool?

Leave a comment... I'd love to hear your suggestions.

Quilt Happy!

Melva

Linking with:

To Do Tuesday at Chris Knits & Sews
Mid-week Makers at Quilt Fabrication
Wednesday Wait Loss at The Inquiring Quilter
Stitch Sew & Show at Life in the Scrap Patch
Put Your Foot Down at For the Love of Geese
Can I Get A Whoop Whoop at Confessions of a Fabric Addict
Off The Wall Friday with Nina Marie
Brag About Your Beauties at From Bolt to Beauty
Peacock Party at Wendy’s Quilts and More
Friday Foto Fun at Powered by Quilting
Finished or Not Friday at Alycia Quilts
Oh Scrap! at Quilting is More Fun Than Housework
Sunday Stash at QuiltPaintCreate
Patchwork & Quilts at The Quilting Patch
Scrap Happy Saturday at Super Scrappy
UFO Busting at Tish’s Wonderland


Monday, June 7, 2021

Indian Stars, Trail's End and Playing with Dolls

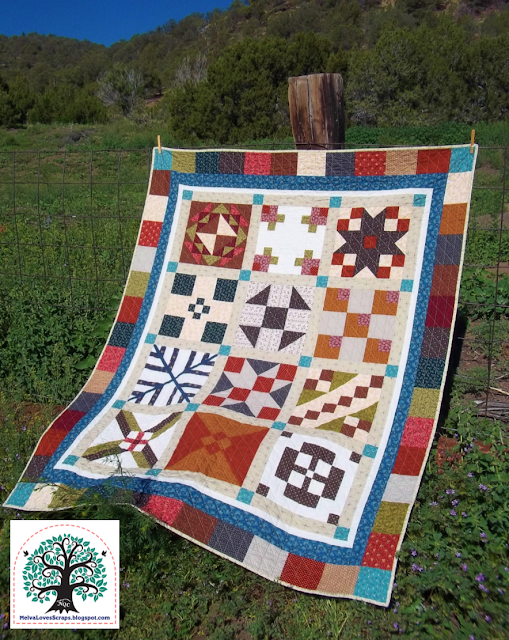
✔  With my finish of the Pieces of the Santa Fe Trail Quilt I did a mini photo shoot on Saturday morning.  I still want to get some shots on the actual Trail, but for now, here is one of the first pictures of the finished quilt, in its entirety...


Just this morning as I was typing up some additional excerpts for future stories of the sew along I came across this...

Our trail often led among herds of buffalo so numerous that at time we were half afraid.  The vast open country that is gone from us forever rippled like a silver sea in the sunshine.  Running across the sea of the grass were the buffalo trails; narrow paths worn deep into the earth.  They were seldom more than eight inches across, and always ran north and south.  A buffalo is a wise animal and knows instinctively  that water flows eastward away from the Rocky Mountains and that the nearest way to running water was always north or south.  Scattered along the buffalo trails were the buffalo wallows, small lagoons of rain water.  They were like turquoise beads strung on a dark-brown string.  The buffalo wallows, they told us, were made by buffalo bulls fighting.  They would put their heads together and slowly walk round and round making a depression that caught the rain water.

I was struck with inspiration and HAD to make a mini-block...  It is 4" finished and will become a quilted coaster.  A new block will be published on Thursday!  Have you finished your Indian Star block yet?  There is still time to link up for a chance to win a free fat-quarter.  (Sorry, US addresses only)  Also on Thursday, The Double Nine pattern will become $2.  Grab yours now while it is still free!


After the mini photo shoot I pulled out the Paper Doll Quilts... I started making patterns and selecting an assortment of fabrics to make shirts, pants, shorts, dresses and more.

✔  I have enough made for the bigger dolls right now.  I will be passing on the patterns and instructions for making more to my Mom. 

And since I have to create a tutorial for her, you will be able to benefit from it as well... when it is done. 😁

But for those have have burning questions now, I am using a Velcro product that you iron on to attach the outfits to the dolls.  I placed a small amount on the underwear near each arm and down around the "panty line".  These are all shown in the picture with arrows pointing to them.  I placed the "soft" part of the velcro on the dolls and the "hook" on the clothing.  I didn't want anything stiff or pokey on the actual quilt.  This iron on product was purchased at our local Wally World, but I need more so I will finding an on-line source for it because... well, I don't really like to support the local big box bully.  These are just my personal feelings and when desperate times call for desperate measures I cave.


You can get the pattern at Red Boot Quilt Company... I enlarged the patterns for the bigger dolls, making it easier for smaller hands to better manage the dressing and undressing of the dolls.  

❧  I have decided that I need to make one more of each sized doll to keep for me.  It has been such fun creating the various outfits!  I think I will be making more in the future with a variety of seasonal themes, such as Halloween, Christmas, Valentines, etc.  To ensure that I have the velcro placements on the clothes correct, it is necessary to keep a one-block mini quilt for me.  Plus, I can keep the dolls and a few outfits here for the girls to play with. 

I will move on to the smaller dolls (original size of the pattern) next week.  We finally got the camper onto the truck and we are chomping at the bit to get out of here!  

❧  I have several postcard block kits prepped to take camping.  I am all caught up with the blocks for our camping journal quilt so I am working on some rather "generic" blocks for possibilities to use right now.  Like a night sky block featuring the big dipper and a larger star, open space, a pine tree, a barrel cactus, campfire and an Ohio star block that can represent a sunflower or a daisy.

Rachel over at Fiona Sandwich is holding a virtual "summer camp" with a sort of a bingo card and a variety of things to complete.  You can find full details by following the link above. It has been fun seeing the blocks that the participants are making.  I'll be sharing some soon!

Do you have any travel plans for the summer?  

Leave a comment... I'd love to hear what you will be up to.

Piece Happy!

Melva
 
Linking with:

To Do Tuesday at Chris Knits & Sews
Mid-week Makers at Quilt Fabrication
Wednesday Wait Loss at The Inquiring Quilter
Stitch Sew & Show at Life in the Scrap Patch


Thursday, June 3, 2021

In a Bind About the Binding

Recently I was doing calculations for fabric requirements to finish the Santa Fe Trail Quilt.  I had purchased fabric for the borders and backing based on estimation, but could have used an extra yard so that I wouldn't have needed to piece the backing, but I'm okay with that. 


At the same time I had picked up an end-cut of a pretty green calico, less than a half-yard.  While finishing up the borders my eyes kept wandering back to this pretty green calico.  I did some quick calculations and determined that there was not enough to do the binding.  I was SOOOOOOOO sad.  😭I thought about seeing if I could locate more on-line somewhere, but decided against that because a two-color binding could look interesting as well.  I located some darker green in my reproduction stash and they looked stunning together!  I thought to myself, "Yes!  That's perfect", and set it aside until I was ready to make the binding.  

That time arrived yesterday and I excitedly pulled my fabric, made some calculations and discovered I didn't have enough of the contrasting green.  I did have enough to have the two-color binding in reverse of what is shown, but that wasn't as appealing to my mind's eye. 

I revisited the option of finding more green calico somewhere for a few seconds.  Then I went to my regular stash and found a green that would have worked... but still not what I wanted.  And, it wasn't Civil War Reproduction, which I really wanted to stick with.

I just really, really wanted only the green calico as the binding.  As I stood brooding over the situation I glanced at my two-color binding sample with the "backside" showing and an epiphany happened!


I COULD have just the green calico binding if I used unbleached muslin with the calico to create a two-color binding but sew it on backwards.

All was right with the world!  **happy dance, happy dance**


If you want more details about making a two-color binding, you can find them over on a post I shared in 2018... Binding Techniques.

I will be enjoying a binge session on Netflix today as I hand-stitch this binding. I know that I will have a Friday Finish... and maybe... just maybe I will have a photo shoot to share!


What are some your favorite binding tips?  Not long ago I saw Diane Harris of  Stash Bandit Quilting share that she now presses her binding after attaching it so that it lays nice and flat when turning it and her 2-1/4" wide binding is easier to sew down.  

I prefer to use 2-1/2" wide binding so that there is a skosh more room... I tried pressing the binding as Diane suggested and it really does make the turning of the binding easier... And I have lots of room... so much so, I may consider reverting back to the 2-1/4" wide, double fold binding.

Do you have any binding tips to share?

Leave a comment... I'd love to hear what you have learned.

Sew Happy!

Melva

Linking with:

Put Your Foot Down at For the Love of Geese
Needle & Thread Thursday at My Quilt Infatuation
Can I Get A Whoop Whoop at Confessions of a Fabric Addict
Off The Wall Friday with Nina Marie
Brag About Your Beauties at From Bolt to Beauty
Peacock Party at Wendy’s Quilts and More
Friday Foto Fun at Powered by Quilting
Finished or Not Friday at Alycia Quilts
Scrap Happy Saturday at Super Scrappy
UFO Busting at Tish’s Wonderland
Oh Scrap! at Quilting is More Fun Than Housework
Sunday Stash at QuiltPaintCreate
Patchwork & Quilts at The Quilting Patch
Monday Making at Love Laugh Quilt
Design Wall Monday at Small Quilts and Doll Quilts


Tuesday, June 1, 2021

Back on the Trail

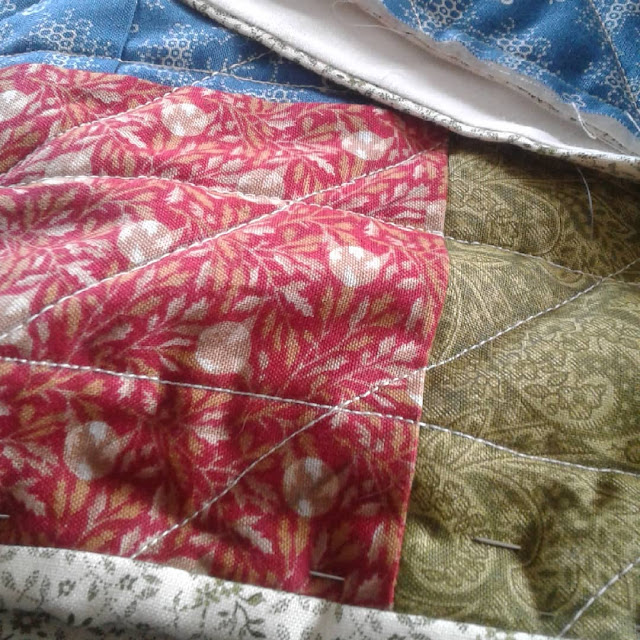
With the completion of the Brand quilt last week my attention has been on the Santa Fe Trail Quilt.  I spent much of the weekend marking and quilting.  I chose a "hanging diamond" quilt design after doing some searching through some of my books for vintage quilts and heirloom quilts.  


As my reference book stated, "Often a quilt needs straight-line quilting, but stitching in the ditch alone will not add any surface texture.  Therefore, an old, traditional way to achieve a heavy amount of quilting using straight lines - yet adding diagonal lines for interest - is stitching "hanging diamonds".  This technique uses straight lines, parallel to the border for the lengthwise direction of the quilt, then crosses the stitches with one-directional diagonal lines."


My quilting lines are 1-1/2" apart.  And with the use of the Hobbs Heirloom 80/20 Cotton/poly batting, when this quilt is washed and dried it will have a vintage look and feel to it.  

FYI, for those participating in the Santa Fe Trail Sew Along, the fabric requirements for the sashing strips, borders, backing and binding will be included with block #4 on June 10th.

Once this Trail quilt is completed I will have a photo shoot at one of the nearby wagon tracks sites.  We have rain in the past few weeks and the prairies are lush and green and the flowers are blooming.  It should be a beautiful setting!


Beyond the Trail, I will return to the Paper Doll Quilts for our grand-daughters.  This one will be my One Month Goal... 

I am looking forward to creating some great outfits for these dolls!  A few that I have in mind are ballerinas, cheer leaders, basketball players, and a super hero or two.  Oh, and since I have been on such a "western" theme, a cowboy with jeans, a vest and red bandana. 🤠

What sort of clothing would YOU suggest?

Leave a comment... I welcome your ideas!

Piece Happy!

Melva

Linking with:

To Do Tuesday at Chris Knits & Sews
One Monthly Goal at Elm Street Quilts
Mid-week Makers at Quilt Fabrication
Wednesday Wait Loss at The Inquiring Quilter
Stitch Sew & Show at Life in the Scrap Patch