Pages

Friday, November 22, 2019

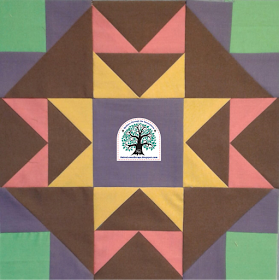
2019 Color Challenge - Yellow - Black-eyed Susan


I made my 2019 Color Challenge block offered by Patterns by Jen early in the month because I knew that I had lots to do this month... yet the completed block sat there staring me in the face as I pondered what to write about it...


It was bright and early this morning (5 AM!) that I suddenly recalled that when Dave and I renewed our wedding vows in 1998 on our 13th anniversary  that there were Black Eyed Susan flowers that decorated the front porch of the house we used for the celebration.  (It is a loooong story about why we decided to do it then and I'm not sure it would even make sense to ME nowadays... I mean 25 is much more reasonable)


When I searched the meaning of the Black Eyed Susan the web indicated that "Fun, flirty and charming is the meaning emanating from the Black Eyed Susan flower symbolism, add in a flair for happiness and a heart full of smiles and you have a recipe for joy. Black eyed Susan is a flower of the solar plexus. Black Eyed Susan number is 8."

As luck would have it, the block even matches the porch color with the splash of turquoise that stands out!


It was a challenging time of life for me... I had turned 33 and suddenly, after years of knowing we (Dave & I both) were done with having more children... but my biological clock seemed to think otherwise.  **Ugh**

We even, for a brief crazy moment, thought of reversing the surgical procedure that had been done in 1990! As I look back, it really was crazy...  

We stood before family and a few close friends as we renewed our vows...

"You are my best friend, my companion, my consort, my jester... my most highly honored person... so do I choose you, so do I love you, so do I promise, from this day forward to be yours.

I take you forever into my heart, and loving you still, I promise that I shall be steadfast always in my love."

The simplicity of the wild flowers gathered by my friend were perfect for the day... and 21 years later.  A perfect memory...


So, tell me... what is one of your "perfect memories"?

Leave a message to let me know... I'd love to hear from you. 

Quilt Happy!

Melva
Plan to join me for a fun sew along that will feature vintage Kansas City Star quilt blocks!


Linking with:

Scrap Happy Saturday at Super Scrappy
UFO Busting at Tish’s Wonderland
BOMs Away at What A Hoot Quilts
Sunday Stash at QuiltPaintCreate
What I Made Monday at Pretty Piney
Monday Making at Love Laugh Quilt
Design Wall Monday at Small Quilts and Doll Quilts
Monthly Color challenge at Patterns By Jen
Colour & Inspiration at Clever Chameleon Quilting
Mid-week Makers at Quilt Fabrication
Wednesday Wait Loss at The Inquiring Quilter
Put Your Foot Down at For the Love of Geese
Can I Get A Whoop Whoop at Confessions of a Fabric Addict
Peacock Party at Wendy’s Quilts and More
Finished or Not Friday at Alycia Quilts

Monday, November 18, 2019

A Time For All Seasons - November

This month's A Time For All Seasons block from Joan at Moosestash Quilting captures the fall/Thanksgiving theme so wonderfully...


I did one colorful block that reminds me of Indian Corn...  and a fall wreath that I made with the girls one year for Thanksgiving.  It is looking a little tired but I love the little corn husk dolls that are on it and I simply cannot bear to part with it yet. 💓

We made the wreath with grape vines that grew on the property when we lived in Illinois (25 years ago!) and then made those little corn husk dolls when I introduced them to Laura Ingalls Wilder's "Little House" books.  

Sadly, the books never captured their attention like they did mine.  But they both have a love for reading so it isn't all bad. 😉


And while winter has attempted to poke its nose into the business of autumn, it has been short lived.  

So last weekend when my husband had the opportunity to go elk hunting with a friend I took advantage of the beautiful "Indian Summer" and enjoyed a walk at the state park not far from my home.


The landscape, along with the thought of the "Little House" books fresh in my mind, I was inspired to make a second block...  This one featuring some calico and some of the hand-dyed eco-printed fabric that I have recently added to my stash.


With Thanksgiving just around the corner we are planning to go camping.  Yes... one last time until next February/March.  Our children will be celebrating on Thursday with their respective in-laws and everyone will come together for a relaxing day on the following Saturday.  (You know, I love that the girls are married and our family has grown, but one of the hardest adjustments I have had is the fact that we have to "share" them when it comes to holidays.)

Our menu will consist of turkey (of course!), dressing, mashed potatoes, gravy, a vegetable side dish (green beans or carrots) and fruit salad.  Oh, and don't forget the cranberries!  

Cranberries are probably my favorite side... a little tart, a little sweet.  I recall as a kid my Mom making them by following the directions on the package.  My  Dad must have asked her to try making them... they were his favorite as well.  They were yummy, but they didn't set or gel... The next day she was on the phone with my Aunt Clara (Dad's sister) asking "What's the secret was to getting cranberries to thicken as they cool?" 

That secret was a package of orange gelatin!  There you have it!  Follow the recipe on the package and when they are done cooking, stir in a package of orange jell-o.


What is your favorite side dish to a Thanksgiving (or turkey) meal?

Leave a comment... I'd love to hear from you.

Quilt Happy,

Melva
Plan to join me for a fun sew along that will feature vintage Kansas City Star quilt blocks!

Linking with:

BOMs Away at What A Hoot Quilts

What I Made Monday at Pretty Piney
Monday Making at Love Laugh Quilt
Design Wall Monday at Small Quilts and Doll Quilts
Colour & Inspiration at Clever Chameleon Quilting
Mid-week Makers at Quilt Fabrication
Wednesday Wait Loss at The Inquiring Quilter
Put Your Foot Down at For the Love of Geese
Needle & Thread Thursday at My Quilt Infatuation
Creative Compulsions at Bijou Bead Boutique
Can I Get A Whoop Whoop at Confessions of a Fabric Addict
Off The Wall Friday with Nina Marie
Brag About Your Beauties at From Bolt to Beauty
Peacock Party at Wendy’s Quilts and More

Finished or Not Friday at Alycia Quilts

Tuesday, November 12, 2019

Stitch It & Gift It Blog Hop & Give Away!


Welcome to the Stitch It & Gift It blog hop!  

Many thanks to Carla at Creatin' in the Sticks for being the hostess with the mostest and coordinating this fun hop!

I am one of those people that want each holiday to get its fair share of time to be celebrated... 

I am also one of those people that will do Christmas shopping year 'round.  And though it is not yet Thanksgiving, it is totally fair game to begin thinking Christmas gifts... what to make and who gets the recipients will be.  


Several years ago I purchased a pretty little wallet at a local rummage sale.  Every time I go to the bank to make a deposit one of the tellers would comment about how much she liked it.  Once she asked if I made it.  When I replied "No, but I could make one like it" she expressed her interest.

And I thought, "What girlfriend wouldn't like a wallet like this one?"  So I added the project to my "To do" list in my mind...  you know... for "someday".

Recently I found myself with no batting in storage to be able to finish the current quilt project (How did this even happen???) Now was the perfect opportunity!  Someday arrived!

I delved into the storage bin of pretty silky-satiny fabrics in search of options, took some dimensions of my wallet and started cutting. 

(A few months ago I acquired a very large stash of all sort of fabrics...  I made skirts and shorts that will be included in the Operation Christmas Child shoe boxes that the church does each year.  And I gave a good bit of fabric away... some to my daughter, some to my sister-in-law, some to friends and the remainder that I didn't think I could/would use (let's be realistic here... I CANNOT save all the fabric!) went to the local theater for their use for costumes and set designs.  (We happily accepted the offer of tickets for a performance in exchange for it 🤩) )

Here you go... step by step tutorial. 

Cut two pieces of fabric 14-1/2" x 7-3/4".  Cut one piece of fusible interfacing (same size 14-1/2" x 7-3/4") to stabilize the outside piece.  With right sides together, layer the fabric and sew, leaving an opening of about 2-3 inches on one end (7-3/4" wide) to be able to turn.


Clip corners and turn.  Press, being careful to press the seams at the opening nice and straight.


Top stitch both ends and fold up 3-1/4".  Press.


Cut two more pieces of fabric 7-3/4" x 7" - this is for the pocket.  Stabilize one piece of the pocket fabric, stitch together leaving an opening, clip corners, turn and press... top stitch the ends (7-3/4").

Stitch a piece of hook & loop tape into place as shown... (You can choose to do smaller pieces in the center or a longer to cover most of the opening of the pocket.  You may notice that the original wallet has a zippered closure... I don't get along with zippers so I chose an alternate version!)


Fold in half and press.  Position the pocket slightly above (approximately 1/4") the crease of the lower section as shown in the picture here.
<<<

Pin top and bottom pockets in place and stitch...


You are now ready to gift this pretty little wallet!  While you're at it, make two or three, or more!  But you will certainly want to make one to keep for yourself as well. These little wallets make up quickly... about an hour.  Leaving plenty of time for other great projects too :)

You could make it as a checkbook cover for your favorite guy as well... just by picking some fabric that is a little more masculine like camo or a plaid.  

A PDF of the tutorial is available here.  This tutorial is free and available through Payhip.  You will have to set up an account with Payhip in order to download the file.

You may have noticed from the pictures in the tutorial  that I made two of these wallets.  My bank teller purchased one and I am giving away (YES!  Giving away!)  The second one.  Want a chance to win???  Simply leave a comment before November 18th in answer to the question below...  


What is one of your favorite Holiday traditions?

We have many traditions, but when our girls were younger we started putting clues on the gifts and we would one by one read a clue, try to guess the gift and then open it.  It takes away the rush and chaos of everyone opening gifts at the same time and we ALL get to enjoy gift and savor the moment.  It can sometimes take more than an hour to get through all of the gifts... but that is okay. 

Stitch it... and then Gift it!  

Melva

Be sure to visit the other bloggers to see what they are stitchin' up!  Happy Hopping!

Monday, November 11th


Tuesday, November 12th

Wednesday, November 13th


Thursday, November 14th


Friday, November 15th

Plan to join me for a fun sew along that will feature vintage Kansas City Star quilt blocks!


Linking with:

Mid-week Makers at Quilt Fabrication
Wednesday Wait Loss at The Inquiring Quilter
Put Your Foot Down at For the Love of Geese
Creative Compulsions at Bijou Bead Boutique
Can I Get A Whoop Whoop at Confessions of a Fabric Addict
Off The Wall Friday with Nina Marie
Brag About Your Beauties at From Bolt to Beauty
Peacock Party at Wendy’s Quilts and More
Finished or Not Friday at Alycia Quilts
Scrap Happy Saturday at Super Scrappy

UFO Busting at Tish’s Wonderland


Saturday, November 9, 2019

Eco-Printing

A few months ago my friend introduced me to a fabric dying process called Eco-printing.  She was making silk scarves dyed with a variety of things from nature, such as leaves and flowers, black walnut dye and rusty water.

When I did a search for it this is the description I found...

"At its root, eco printing refers to the act of directly applying plants to textiles to alter color, apply color and create interesting designs. “Natural dyeing” is a component, as everything used is natural, such as flowers, leaves, bark, bugs, roots etc. (yes…. bugs! I’ll get into that a little later)"

I love the way Kayleen said it...  "I love this process because you can put it all together, but like life, it often turns out differently than was expected. The outcome is a surprise and you have an opportunity to let go of the expected outcome and accept the gift of what is."

So let's start at the beginning...  It was suggested to me to use 100% silk, linen or cotton.  (You can also use 100% cotton t-shirts.) 

**Disclaimer**  I am NOT an expert on this process and am still learning with each session.

There are many techniques for eco-printing and these directions and results are based on my personal experiences.

Step 1:  Soak fabric in water, or mordant made of vinegar water or alum water.  Wring out until just damp.

A mordant or dye fixative is a substance used to set (i.e. bind) dyes on fabrics by forming a coordination complex with the dye, which then attaches to the fabric.  Basically, natural dyes will not adhere to natural fibers without the use of a mordant or fixative. While you may initially get a beautiful result from the dyeing, it will soon wash out or fade away!

Alum, vinegar, iron, copper, tin and chrome are some examples of a mordant.  I have only used vinegar, rust and alum as a mordant.  


Step 2:  Soak items that you want to leave an imprint in rust water or black walnut dye for a minimum of 10-15 minutes... the longer the better.  I am generally too impatient to wait much longer.  <>  


Step 3:  Arrange items on the damp fabric.  Top with a “blanket”.  

A rust blanket can be used repeatedly.  

In the photo to the right you will see that I have two different blankets... one was soaked in vinegar water and the second was soaked in rust water.


Step 4:  Roll the fabric onto a stick very tightly.  This is called bundling.  

Your choice of product for bundling can affect your final product.

You can use  a piece of metal rebar, a wooden dowel, a small branch, or copper pipe for a variety of staining.  You can also use PVC if you don't want any additional staining at all.)

Step 5:  Secure tightly with twine, or wire.

Step 6:  Steam for 90 minutes.

Step 7:  Allow to cure for 24 hours while enclosed in a plastic bag.

Step 8:  Unroll and allow to dry.  Press with hot iron to help to “set the color”. 


Step 9:  Wash with a gentle soap.  Dry and press one last time.  

And here is my first result >>>

You can see that the variety of staining from the rust blanket even though the center section of the silk scarf was covered with the rust blanket.  The lower end of the scarf had the "blank" blanket and the top end had no blanket at all.

Below is a picture of the "blankets" used with the silk scarf.  


Here is a small block of aspen trees (pattern from Fiona Sandwich's National Park Postcard library) that I recently made using the lighter of the two "blankets" shown above.


My larger piece of linen seems to be asking to become a wall hanging... What do you think?


As I pondered the results and the options with so many variables and the unpredictability for the finished product I wondered...  what would copper wire do?  What about maple or walnut dowels?  What if you wrapped the dowel with copper wire or silver solder???  The options are endless!!!

My very supportive husband graciously entertained my request for the dowels.  Because he has a supply of maple and walnut stock blanks for his business he allowed me to pick a few out...

The next printing session involved all of the above mentioned materials... Maple and walnut dowels, copper wire and silver/tin wire.

Here are some of my results...  


Here I am using a linen table cloth and placed items on the center 1/3 of the cloth...


I folded the cloth over the nature items and layered again...

I finally folded over the last 1/3 of the table cloth and bundled.  

I rolled the cloth on a walnut dowel that was wrapped with silver/tin solder.  

I secured the bundle with copper wire and steamed for approximately 2 hours because the bundle was so thick.


You can see that a maple leaf left some heavy staining and the copper wire cause some interesting colors as well...

The final results...

You can see the dowel wrapped with wire in the picture at the right and the pattern imprinted on the fabric.  The deep purple staining was from the walnut wood.

I am fascinated with this dying process and am curious about so many other options.  The combinations are endless!  I think I will need to exercise some self control because I have quilting that needs to be done!

I will be doing some more research about natural dyes and further investigation about the combination of different fabrics, mordants and the various reactions and results...

Want to know more yourself?  Do a search... I found that there is a "starter kit" available (no affiliation - I just thought it was interesting.)  I was lucky enough to have a friend that had already collected the various pots and pans and supplies required.

Have fun!


What are some of your ideas for using hand-dyed fabric like this?  

Leave a comment.  I'd love to hear from you.

Stay calm and quilt on,

Melva


Join me for the sew along that will feature vintage Kansas City Star Quilt Blocks


Linking with:

Can I Get A Whoop Whoop at Confessions of a Fabric Addict
Off The Wall Friday with Nina Marie
Brag About Your Beauties at From Bolt to Beauty
Peacock Party at Wendy’s Quilts and More
Scrap Happy Saturday at Super Scrappy
UFO Busting at Tish’s Wonderland
Finished or Not Friday at Alycia Quilts
What I Made Monday at Pretty Piney
Monday Making at Love Laugh Quilt
Design Wall Monday at Small Quilts and Doll Quilts
Colour & Inspiration at Clever Chameleon Quilting